Both the backend and the frontend have been dockerized. Thus,
regardless your platform, install Docker & docker-compose first.
For user
- Clone the repo.
- Go to the project root folder,
docker-compose up --build -d. - Create a backend admin user:
docker-compose run web python
   manage.py createsuperuser
, and follow the instructions. Email is optional. - Go to browser
http://localhost:8084, and use the user account to login.
Now you should be ready to use the application by adding stocks and sectors.
For developers
Modify code
Using the docker way is preferred. Code will be mounted into the
docker as volume (see docker-compose.yaml for details). Thus
changes done on your local editor will be reflected in the running
docker as live.
Debugging
It may sound 1980. But the most effective way is to use
docker-compose logs -f <service name> to see stack trace and/or
error messages.
Testing
Looking for volunteers!!
For network admins
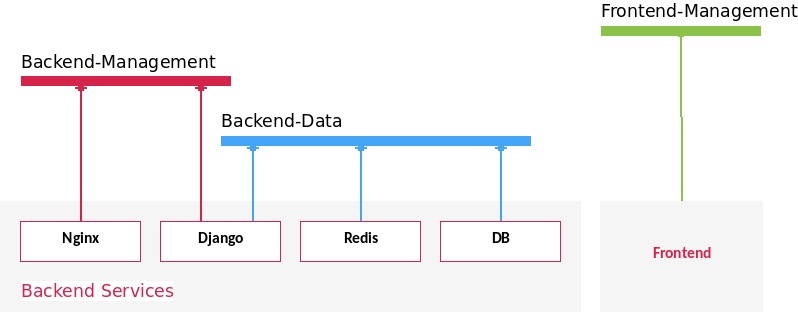
networks
Network of the setup is fairly simple. We distinguish data vs. management:
ports
I try to limit exposure of ports on docker host so this application
can be easily co-hosted with others without causing port conflicts.
In essence, 8084 is the frontend UI port, and 8003 is the backend
API port. All others are docker-to-docker only.
| Component | Docker Port | Service | Host Map |
|---|---|---|---|
| Frontend | 80 | Main frontend app w/ Nginx built-in | 8084 |
| Backend | 80 | Nginx proxy | 8003 |
| Backend | 3306 | MySql DB | none |
| Backend | 8001 | Django app | none |
| Backend | 6379 | Redis | none |
Port mapping can be changed in docker-compose.yml. For example, if
to change the frontend proxy from 8084 to 9999, change the line
ports from 8084:80 to 9999:80. See docker-compose doc for
details.
frontend:
  ....
  ports:
    - "8084:80"  # <========= change this line!
  ....
— by Feng Xia